Alternative 2 -- Scan Using Photoshop and NikonScan
This method corrects the tone and blue cast in Photoshop and passes the corrections back to NikonScan to perform the final scan. The advantage is that the image is viewed exactly as it will appear in Photoshop. Obviously it's inconvenient to switch between applications, but users may find Photoshop's larger curves easier to adjust than NikonScan's smaller curves. Also NikonScan's image histogram is formed from the preview scan, which is done at 270 dpi. The Photoshop histogram is more representative because it accounts for all of the image pixels. At the default resolution (1350 dpi) this means the histogram has 25 times more observations. On the other hand, I find NikonScan's presentation, the super-imposition of the gamma curve on the histogram, very convenient and sufficient for the majority of scans. The appropriate adjustments can be applied through the curves or the levels controls. Because the adjustment was relatively simple I used the levels adjustment.
Another reason for this dual approach is that before creating the image file, the scanning program downsamples from 12- or 14-bits to 8-bits if an 8-bit file is called-for by the user. There is an advantage to achieving tonal and color balance in the scanner program. Prior to downsampling, the latest versions of NikonScan apply the user’s curves and black-white points settings. Having set tonal and color balance here virtually eliminates any justification to output a 16-bit file for subsequent correction in the image editing program. This technique achieves a full-intensity range, but its correct use requires the use of multi-sampling and that the user’s PC is set-up so that the image appears the same when displayed by scanner program and the image editing program. If not, a draft image may be edited in the image editing program, where the curve settings are saved. These are then imported into the scanner program to produce the final scan.
Step 2. Correcting Tone and Blue Cast
Make a scan from the image previewed in step 1. Open this initial image file in Photoshop.
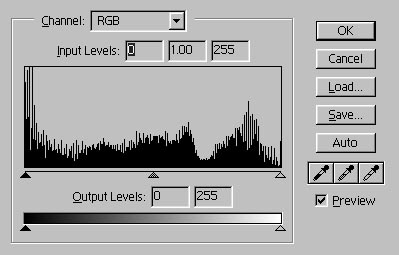
On the menu click Image, Adjust, Levels to display the histogram:
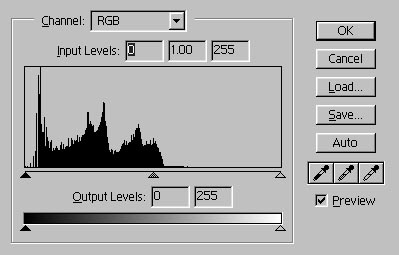 |
Comment: This is the unadjusted image's histogram generated in Step 1. Note that Photoshop has a gray eyedropper, unavailable in NikonScan 2.5. |
Clicking auto expands the histogram and sets the black- and white-points.
 |
This sets the tone for the scan.
Now the point of the exercise: correcting Kodachrome's blue cast. Basically, this cannot be accomplished by using linear correction (e.g. the sliders).
Select the blue channel.
Adjust the blue channel by either moving mid-tone input level marker or editing the mid-tone number. For this picture this was at about .75.
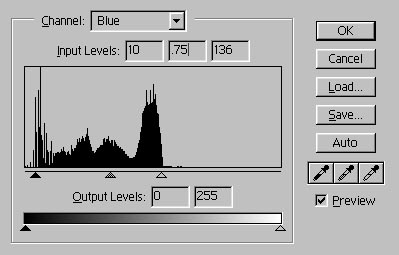
After the blue channel is set the image looks like this:
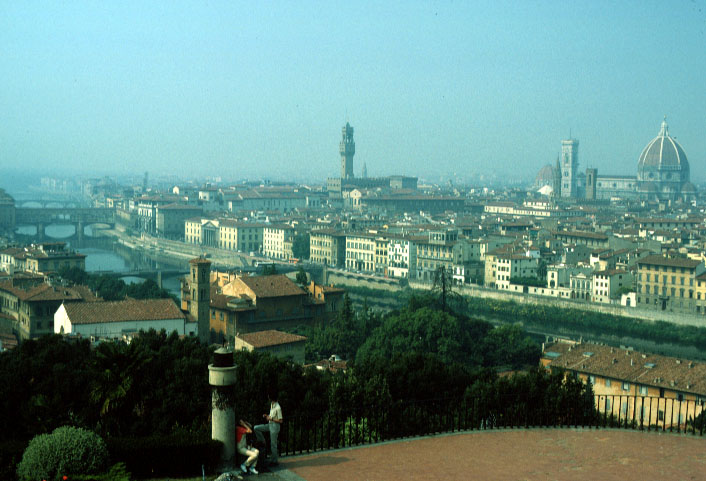
If a high quality is not a concern, this can be the image used.
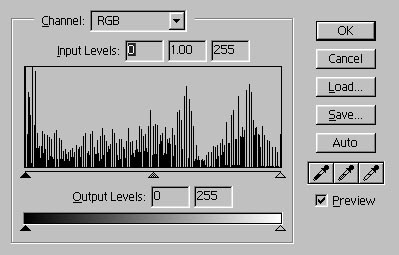 |
Comment: On the other hand, note the discontinuities (left), caused by the curves manipulations. This demonstrates that, if possible, global manipulations should be performed in the scanner before the image is digitized. A similar step 1 raw-scan was performed at 12-bits and adjusted. After the adjustments its histogram shows virtually no sign of having undergone manipulation in contrast to the 8-bit scan, as is readily apparent in the resultant image. Alternative 2, 12-bit adjusted raw-scan and histogram If you are limited to an 8-bit file, a method of minimizing these "drop-outs" and image degradation, is to convert the file to 16-bits, apply the curve manipulations, and re-convert to 8-bits. |
Save settings.
Step 3. Getting the final scan
Open the curves-level drawer in NikonScan and import the saved file. Run the final scan.
The final scan:
This is the Photoshop histogram of the final scan.
 |