Previous versions of NikonScan functioned the same as transparency scanning except that it also inverted the image. NikonScan's color negative mode is different in that it also performs substantial post-scan processing and thus has essentially become a black-box operation.
To understand the requirements of scanning color
negatives and context of this note see Scanning
Color Negatives
NikonScan 3/4 seems to perform these steps:
-
Increases exposure to to lengthen the tonal ranges of the channels (NS 4)
-
Scans at 14/16-bits
-
NikonScan seems to impose its own definition of the black-white point settings (usually about 30 and 255 for output) that are applied; the user black-white point exclusion settings in ‘preferences’ are ignored. The way in which this is implemented is a controversial feature.
-
A curve that darkens is applied
-
Down-samples to 8-bits if 16-bit output is not selected
Comments:
| Step 2.
Scanning in 14-bit and then down-sampling (not truncating) to 8-bit mode
avoids causing gapping in the histograms. Because
negative films typically have narrow density ranges, setting the black and white
points implies a large shift of end-values. | |
| Step 3.
As a result, clipping is seen in the histogram left and right extremes.
The exact black point setting also seems to be dependent on screen gamma
setting and color profile. | |
| Step 4.
This seems to include at least a substantial levels adjustment towards
the shadows. | |
| Steps 3 and 4 seem to be post-scan operations. |
| Analog gain works in the opposite direction of
positive mode: + analog gain means decreased exposure; - means increased exposure | |
| The negative mode has been fixed on the LS-9000 running under NikonScan 4, but not the LS-8000. |
Workaround
If you don't want to use NikonScan's method, I would recommend scanning negatives as positives and using inversion curves. When you consider the time otherwise spent in correction, this method requires less time. I've put up a page outlining several methods to do this: Inverting Negatives to Positives
The Problem with NikonScan's Negative Scan Mode
This is a typical histogram after executing autoexposure on a Kodacolor image with a full range of tones:
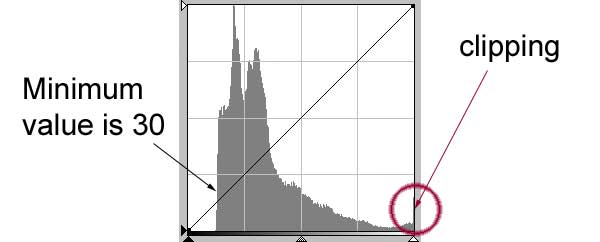
fig. 1 |
A significant part of the tonal range is unavailable and the ability to separate tones is impaired. Trying to analog gain to adjust the image only aggravates the problem. To show that this is a hard limit, the analog gain was set to -0.5. Instead of shifting the distribution left, into values below 30, NikonScan crams more detail against the lower limit, like a wave hitting a brick wall:
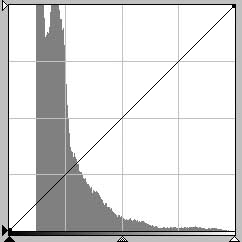
fig. 2 |
The values that were clipped in fig.1 have been moved into the range of imaged values, but pushes some of the shadow tones into the left margin.
Summary
It’s clear that the controversial effects of the negative scan mode arise during post-processing and not as a result of setting exposure as I had thought earlier.
NikonScan’s negative scan mode makes sense when looked at in the context of a batch processing operation. The method automatically sets the black-white points and achieves a reasonably long tonal range, a real time-saver for the volume user. Why did they choose 30 (this will vary depending on the user's screen gamma selection) as the bottom end? Probably because most printers don't begin to show tonal differentiation until about 30, everything below is black.