Remember when you bought that expensive scanner of yours? So you played with your new toy and the scans wowed you. Until, that is, you got to that Kodachrome™ image with the model in a designer pantsuit -- dark brown with a subtle weave. Unfortunately, you couldn’t see that in the scan because the white background spilled over and smeared-out the detail in her clothing.
Well, if you found yourself cursing out loud, you might find it worthwhile to consider making a film mask. A film mask is a transparent frame that overlays the source image and modifies the relative densities of the image elements so that the recording medium can better cope with the density range.
If flare is especially egregious, you should first check for external causes such as fog and dirt on the optics. But a minimal level is intrinsic to CCD scanners. Here we're going to produce a mask to block highlight areas so that light will not spill over into the shadow areas. It is best suited for images with large continuous areas of highlight. It is less suitable for images with many small shadow areas that must be recovered.
In addition to your scanner, you'll need a printer that can print accurately on transparent plastic sheets. I prefer a laser printer because of the opacity of the image and because the toner seems to fuse in place whereas my inkjet has problems with plastic. Admittedly, the variety of printers I’ve had experience with doing this is extremely limited, so I wouldn’t be surprised if your equipment performs differently.
The Problem
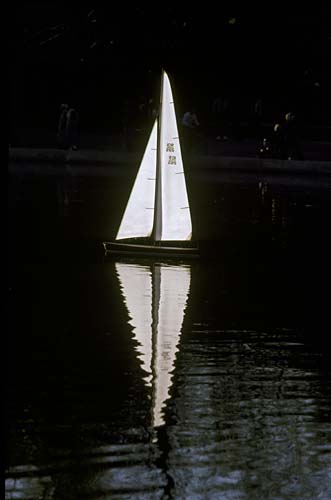
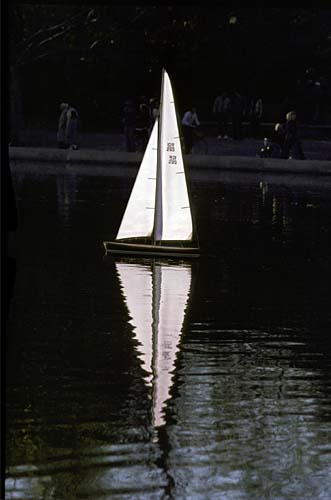
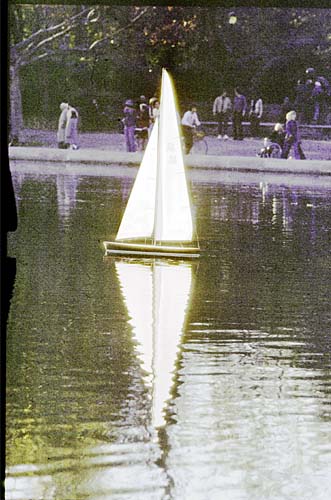
Here's an example, below, a straight scan of a Kodachrome slide. A halo around the sails should be clearly visible (place a finger over the sails), however, enhancing the contrast makes the extent of the flare more visible, below, right.
 |
 |
Approach
We're going to create a film mask of the sails, the source of the flare; register it on the film image; scan for the shadows; and re-combine highlights and shadows.
Method
- Carefully tape the source image to a glass mount. Try to keep the image as flat as possible. You’re going to make multiple images so minimizing potential registration error is paramount.
- Scan the image as you would any other image. Make sure you lock-in the exposure.
- Save, let’s say as Source.tif.
- Read Source.tif into Photoshop.
- Convert to grayscale: Image, Mode, Grayscale.
- Do Image, Adjust, Threshold. If this is your first attempt, try setting the threshold somewhere in the range 64-80 preferably at a local minimum (a low point between histogram peaks). (I’ve set it as high as 128.) The worst flare appears where the density difference between two adjacent areas is greatest. The setting of threshold should result in the low-density area cleanly going white and the high-density area cleanly going black.
Other mask areas, which may have been missed by applying the threshold command, may be included by manually creating figures using the editing commands. There is a lot of latitude for inexactness because the mask doesn’t have to be a photo perfect image.
- Erase small objects, generally those smaller than about 30 pixels. Otherwise these small areas will be difficult to register and may appear as small black or white areas later.
-
Save this as Mask.tif.
- Do Image, Adjust, Invert. The highlight areas will now appear as black.
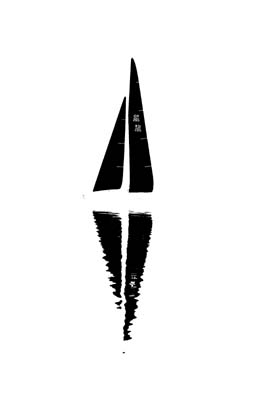
Image after threshold, and inversion |
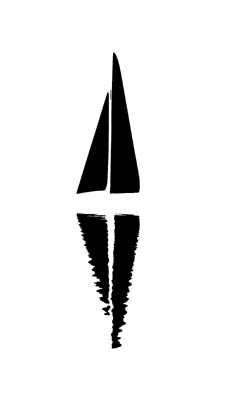
Mask after cleanup of small areas |
Print the inverted image onto a clear plastic sheet*. This will serve as a highlight mask.
Scan the sandwiched image. At this point, because you’re scanning for the shadows only and the highlights have been blocked out, you can push analog gain or exposure aggressively to bring out more detail. If you do this you may have to bring down the RGB later before merging with the highlights. On the other hand, if you choose not to change analog gain, use the saved exposure from the source scan.
 |
Uncorrected scan with highlight mask. Note increased background detail due to AG setting of +2. Without the mask much of this extra detail would have been obliterated by an accompanying increase in flare. |
Save as Shadow.tif.
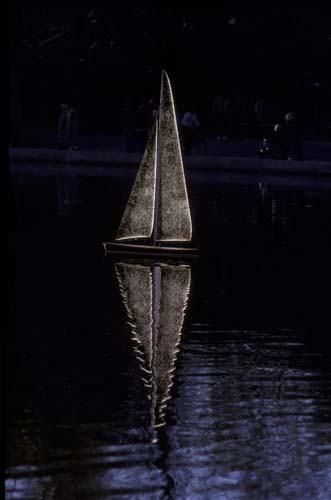
The merged image closely approximates its appearance on the light table |
Enhancing image contrast shows sharply reduced flare |
If the above seems overly long and complicated, try making film masks the traditional way -- exposing a frame and chemically developing it. The digital method is incomparably faster, cheaper, more flexible, and less messy.
This technique was originally devised to address the problem of managing scanner flare. In fact, many of you reading this will immediately recognize this as deriving from that most basic of darkroom techniques--using contrast reduction masks. Conceptually you could make darkroom masks with this same technique. Because the mask is digitally created, you could control the areas to be masked, densities and contrasts of the digitally made mask. And there’s no reason that the mask must be sandwiched with the film in the carrier; as long as it is proportionately sized, it could be placed anywhere between the lens and the easel. Dodging and burning could be accomplished by varying the densities on the mask.
Please let me hear about your experiences with this technique.
* WARNING. Use a plastic sheet designed to be laser printer compatible. The first time I tried this I grabbed a cheap sheet of plastic that was at hand and fed it into the printer. Nothing came out. Of course it had jammed in an inaccessible area. I spent 30 minutes disassembling the laser printer. I found the plastic melted around the fuser roller, and spent another hour laboriously prising the hardened goo from the delicate surface of the roller and snipping away a millimeter at a time with a cuticle scissors.